
When you publish a blog post, it’s essential to do it the right way. Only 10 percent of “Blogging” is about blogging, the rest is about distribution. And that is true for every part of blogging – including the creation of content and the publication of content.
The whole process of creating content needs to be focused on your audience – because your blog is for them, not for you. The essentials of the content writing process are:
- What is your audience interested in?
- How do you solve problems your audience needs to get a solution for?
- How do you reach your existing audience with your post?
- How do you reach new readers with your post?
These four questions lead to a specific process when creating blog posts – a process that should be more or less the same for all bloggers.
This process is divided into three parts – it starts long before you publish your post and ends long after the post has been published.
Before you read on - we have various resources that show you exactly how to use social networks to gain massive traffic and leads. For instance, check out the following:
FREE Step-by-Step Twitter Marketing GuideFREE Pinterest Marketing Ebook
This is what this post will teach you.
What to do BEFORE you publish a blog post
The process of publishing a post starts long before you hit the publish button. It begins with finding a topic for your post, researching keywords, and so on. Let’s have a close look at what you need to do before you hit that button:
Find a topic
When preparing to write a new post, everything starts with finding a topic.
And this is where you begin to focus directly on your audience.
What do you want to write about? Why is your audience interested in this topic?
When you are out of ideas, an excellent way to start finding an idea is to read your competitors’ blogs. What is going on in your niche? Did your competitors write a post you disagree with? Maybe you have additional wisdom to share? Or you can combine the ideas from to posts into a new one?
You can also use an SEO tool like Ubersuggest to get topic ideas by finding the most shared posts in your niche and getting content ideas.
Always keep your audience in mind. You start by examining your competitors, and prosperous and most shared articles in your niche. This way, you make sure that you keep your audience’s needs in mind and create content focused on your niche.
Hey, before you read on - we have in various FREE in-depth guides on similar topics that you can download. For this post, check out:
FREE workbook: CREATE AWESOME BLOG POSTSFREE Beginner's Guide: START A BLOG
Listen to this podcast to find out how I find ideas for content: I’m a Cheat: How I get Ideas for Content in Minutes – Podcast Episode
Research keywords
When you have your topic, it is now time to start with your first task on distributing your content.
Yes, that is right – distribution starts even before you write your post. And long before you publish a blog post.
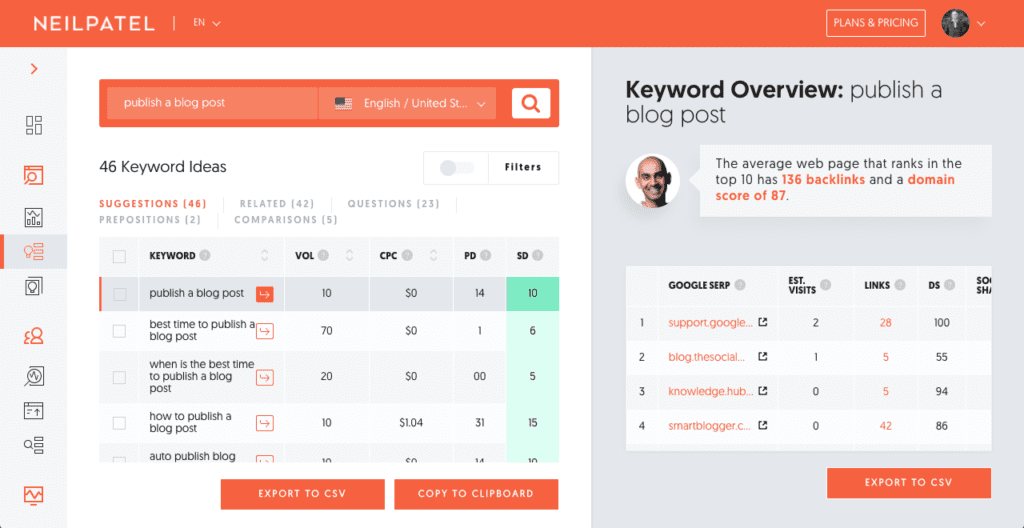
And the reason for that is SEO – you have a topic, but now it is time to research the exact keyword you want to optimize your post for. The keyword will be what your audience will type into Google’s search box to find your post.
I recommend to use Ubersuggest again – start by typing in the “keyphrase” that first comes to your mind and look at the keyword ideas you get from the tool.
You are looking for keywords that have many searches while still being rated with an SEO difficulty of easy.
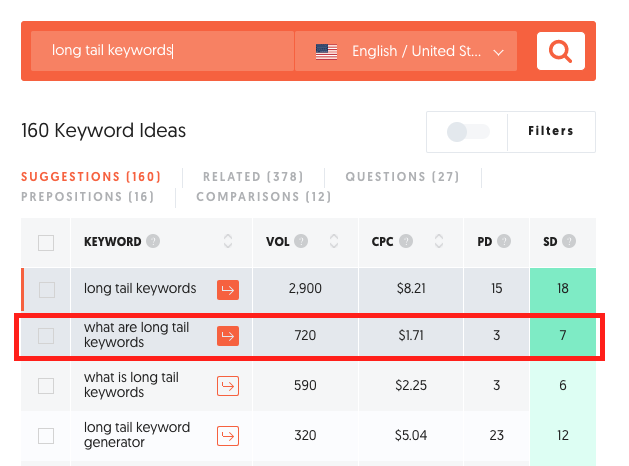
Look for keywords in Ubersuggest that have a relevant amount of searches but low SD (SEO Difficulty)
It will be hard to find a single keyword that is easy to rank for in more crowded niches while that still has a lot of searches. In that case, you will have to use the Long-Tail Keyword Strategy.
The long-tail keywords strategy is based on the idea that most typed in keywords are longer phrases, combinations of multiple keywords, and so on.
Each of these long-tail keywords has little searches going for it. Still, many of these keywords combined have much more traffic to give to your blog than a single high traffic keyword you try to compete for.
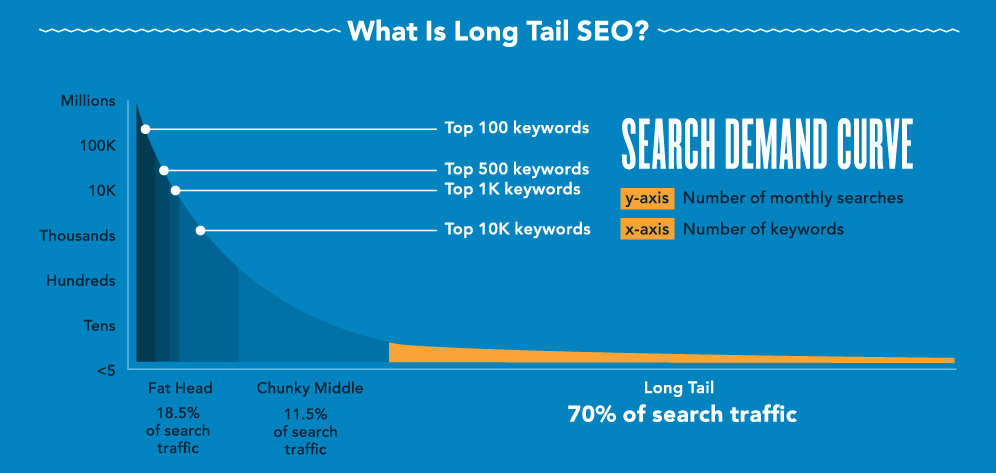
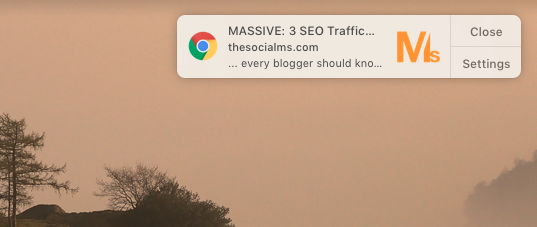
Image Source: Neil Patel
You can read more about the Long Tail Keyword Strategy under the following links:
3 SEO Traffic Hacks Every Blogger Should Know: Bigger Results, Less Work
Neil Patel: How to Integrate Long-Tail Keywords in Your Blog Posts
Research your post
This is where the fun starts. To write a good post, you need to know a lot about that topic, which means you need to read a lot.
I usually start with a simple Google search on the topic – and then I read most of the posts I find.
Well, I skim those posts, digest the most valuable information, and take notes of what I want to mention. And then I start forming a post in my head.
But, while I’m doing this, I don’t write a single word yet. I just get an idea of what I want to write about what I want to say, and what I want to give to my audience with this post. I also take a few notes – which in my case are mostly the links to the most essential information and sources that I want to mention.
This step makes me ready for the next step in the process.
Craft your post, write an outline
When writing a blog post, the structure is essential. You can’t write a good blog post without having a good structure.
That is why, before starting to write, I create an outline for my post. I write a work in progress headline and then create a structure of subheadlines that guide my readers through my post.
A good structure for a post is as follows:
HEADLINE
Introduction
-> SUBHEADLINE
-> Content
-> SUBHEADLINE
-> Introduction to subtopic
-> -> SUBSUBHEADLINE
-> -> Content
-> -> SUBSUBHEADLINE
-> -> Content
-> -> …
-> SUBHEADLINE
-> Content
-> …
-> FINAL WORDS
-> Closing Paragraph
When writing my outline, I NEVER go further down then 2 levels of subheads. Your outline is there to keep the post simple to read and easy to follow, not to make it more complicated than it needs to be.
The outline is also critical because, as a blogger, you need to create long-form content. Your aim is to create a post that is longer than 1000 words. The best performing posts usually have between 1500 and 2500 words, sometimes more.
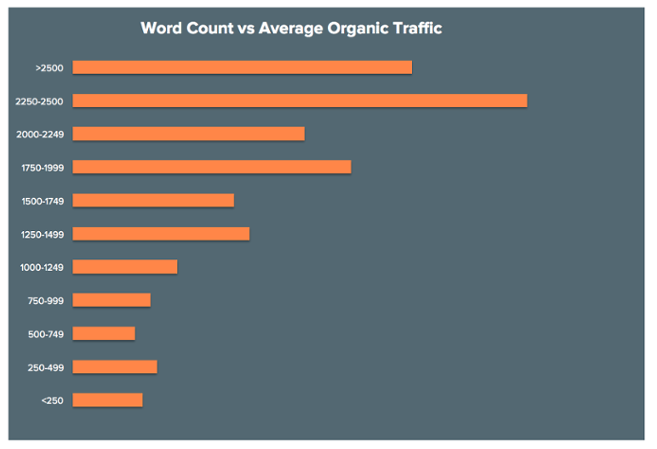
Word Count vs Traffic – Source: Hubspot
To read more on the topic of post length see this post: How long should a Blog Post be?
Write your post content
Now that you have your structure, it’s time to write the blog post. Writing after creating your outline should make it easy to write an engaging, easy-to-understand, and well-structured blog post. You will quickly come up with a post that will perfectly deliver your points and the value of your post to your target audience.
Reexamine your post structure (shorten paragraphs, bullets, …)
After you have written the entire post, go over it one more time. Here is what to look for to improve your post:
- Shorten lengthy paragraphs or divide them into two or more items.
- Shorten long sentences by removing unnecessary words or dividing them into two.
- If the content below a subhead gets too long, think about dividing it into two sections.
These steps are there to make your text easier to read.
Optional: Use Grammarly to edit and correct your spelling
My English is good, but it’s not perfect. I’m not a native speaker, and sometimes it still shows.
But even if you are perfect in English, every written text benefits from editing. Everyone sometimes makes mistakes, and a second or third set of eyes, highlighting problems with your writing, can improve your style massively.
Now, most of us cannot afford an editor or don’t want to work with an external editor all the time. Communication with another person criticizing your content takes time and can be cumbersome.
That’s where Grammarly comes in – it’s an online tool that checks your text for both grammar and spelling, but most importantly style.
Using Grammarly for blogging has the power to massively improve your writing style – and make your blog easier to read and more fun to read.
You can either use the Grammarly editor and correct your writing on the fly or use Grammarly directly in WordPress
Using Grammarly as your personal editorial assistant is highly recommended before you publish a post. I use Grammarly for every single blog post I write!
Optional: Enter your text into your WordPress editor
Many of us don’t write our content directly in WordPress. I use a variety of editors to write my posts. If you didn’t start with your post directly in the WordPress editor, now is the time to enter it into your WordPress installation.
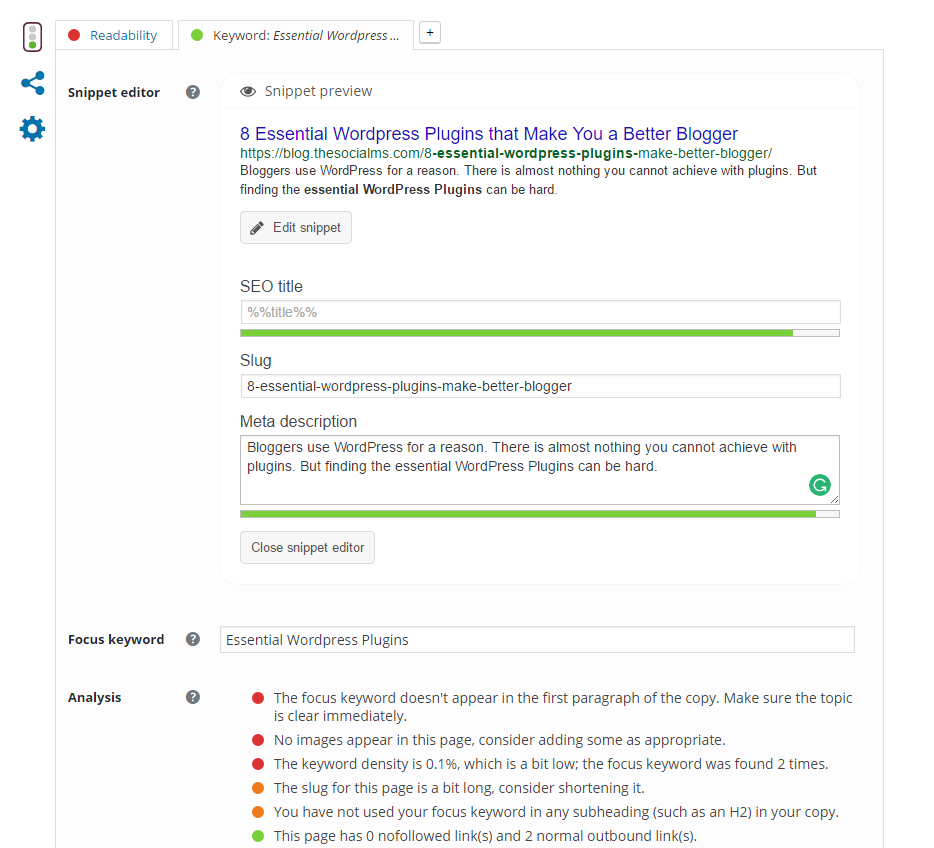
Use Yoast to Keyword Optimize your Post
Use the Yoast SEO plugin to optimize your post for the keywords you’ve chosen above. If you haven’t installed Yoast yet, do it now, as this plugin has the power to improve your SEO results massively.
Follow the suggestions of Yoast until the traffic light system of Yoast shows that your post is now green.
8 Essential WordPress Plugins that Make You a Better Blogger
Place internal links and external links in your post
One activity that should not be underestimated when creating new content is external AND internal linking. It’s very important for SEO that you add links before you publish a blog post. Yoast will tell you to add some of these links to your post, but there is no harm in adding more where appropriate.
Especially internal links are significant:
- They increase time on site for your readers as they click through to more content.
- They improve the SEO value of your existing posts.
Luckily, the WordPress editor makes it very easy to add internal links to your own published posts. Put your cursor anywhere you want to enter a link and start typing the keywords of your existing post. Press CTR – K or COMMAND – K. The WordPress editor will give you a selection of your posts around those keywords, and you can choose which one to add.
Find and/or create images
You are creating long-form content. And structuring your content with headlines and subheads goes a long way, but adding images to get your point across is very important as well.
This is why you should add images to your post wherever possible. Do this right from the start, before you publish a blog post – don’t think you will just add them later.
Taking images from other blog posts in your niche is usually good – as long as you are giving credit to the original blogger!!! (The other blogger benefits from these links.)
Make sure that you are not taking stock photos from the original blogger’s site – the other blogger may or may not have bought them. Still, you haven’t, so you would be using unlicensed content.
For images that you need to create yourself, often, the easiest (and free) tool to use is Canva.
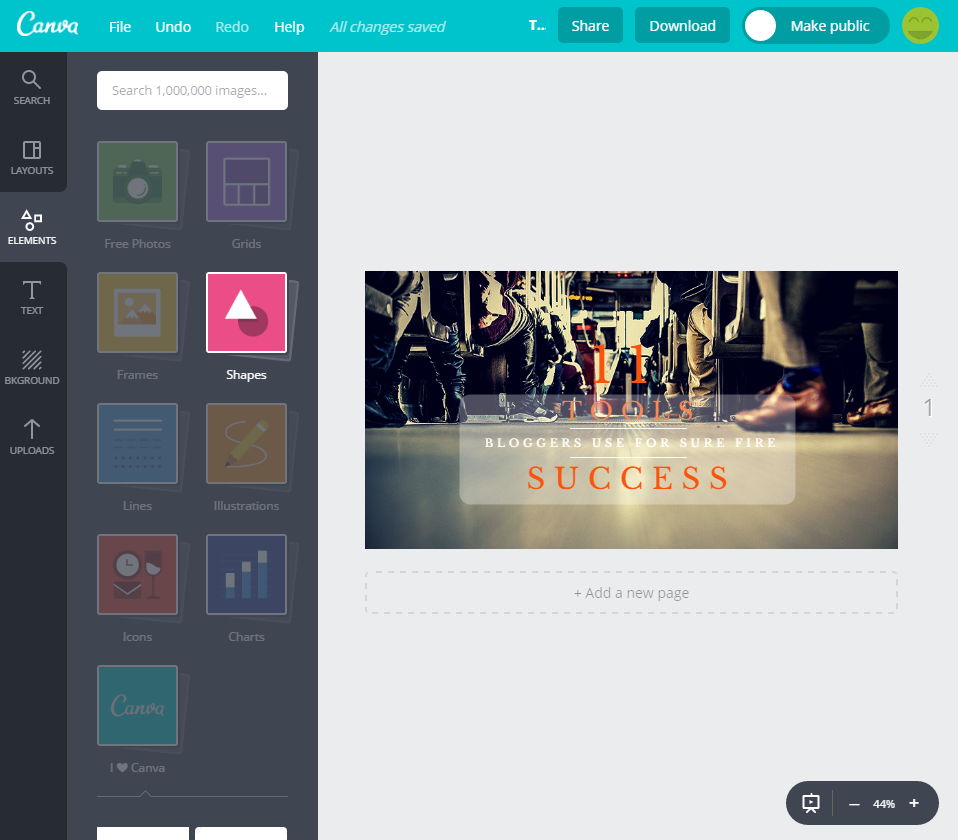
Canva in Action
Also, create images for all social platforms you are using to distribute your post content. Every social media platform needs a different image for your post as they all have different rules and sizes they use!
The Ultimate Guide to Social Media Image Sizes
Turn your work in progress headline into the perfect headline
Until now, your headline wasn’t final. Now it is time to create a headline that you will use when you publish a blog post.
This headline should include your keyword, it should do well in search results, AND it should do well on social sites.
So how do you come up with a headline like that?
The process suggested by many is to write down 25 headlines, and then choose the one that works best for you.
Yes. 25. TWENTY-FIVE!
Why so many? Because this process forces you to think outside the box and find headlines that aren’t along the lines that people expect.
This process was developed and perfected by Upworthy – one of the first clickbait sites on the web. You can think a lot about pure clickbait sites – they know their stuff when it comes to headlines!
You can read more about this process here:
How to Effortlessly Create Captivating Headlines and Subheads
How To Create The Perfect Headline For Clicks AND Shares
Your SEO traffic and social media traffic will massively improve when you go through this process every time before you publish a blog post.
Now, hit that publish button. Publish a blog post!
When you’ve done all the steps above, it’s finally time to hit that publish button.
But you are not done yet!
What to do WHEN you publish a blog post
After you hit the publish button, there are some things you will have to immediately do. This is what will give your new blog post the initial boost of traffic.
Share your post on your social network profiles
The first thing we do when publishing a new post is we push our post via our social media profiles. The most important ones for us are:
- Twitter: We run multiple accounts on Twitter.
- Pinterest: Pinterest is one of the most important social networks for gaining traffic to your site.
- Facebook: It’s still the most prominent social network
This is where you will be glad you created images for all your social networks before.
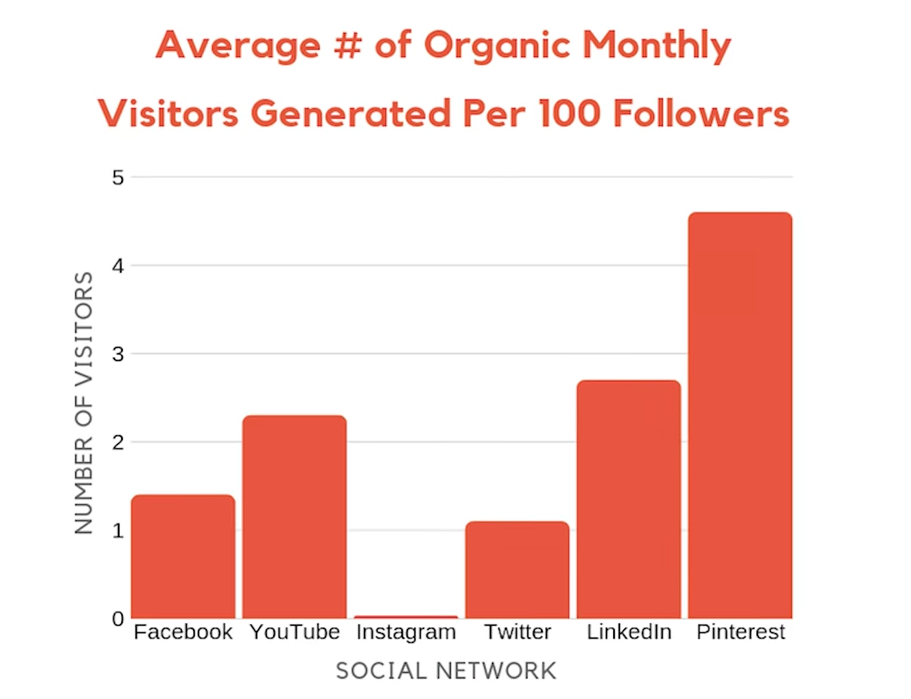
Average number of organic monthly visitors by network. Source: Neil Patel
Depending on your social networks of choice and whether you want to optimize everything, you can schedule your posts on each for the best time to post. This is more beneficial on Twitter and less on Pinterest, as tweets usually become irrelevant after minutes while pins can stay active even after months.
How And Why To Schedule Your Social Media Updates In Advance – And 7 Tools To Get It Right!
Is organic social traffic still possible in 2020? Networks ranked!
Send a newsletter
As you probably know, every blogger striving for success absolutely needs to build an email list. If not, read this:
9 Crucial Reasons Why Your Blog Needs an Email List
But an email list isn’t just there to send your subscribers links to products – it’s also there to turn your subscribers into fans that love your content. And it’s there to build a stream of returning visitors to blog. And you do that by sending your subscribers every article you write!

Email marketing with ConvertKit
This is also an excellent way to check whether your headline works in the long run for SEO and social sites – just use it as your subject line and compare your click rates.
If you are new to blogging, you can start building your email list by using a Mailchimp as your newsletter tool of choice. If you want a better and slightly more advanced tool, you can use ConvertKit, which is also our tool of choice!
Place internal links to your new post in old articles
You’ve already added internal links for SEO reasons to your new post to your older articles.
For the same reasons (added SEO value, longer time on site), you should now add some more internal links to OLDER posts to your newly released articles.
You will massively benefit from this in the long run as both your old articles will stay updated and get more traffic. Your new articles will get more SEO visibility right from the start.
Optional: Send a push notification
Website push notifications are small notifications that you can subscribe to directly from your browser and which get sent to the device you signed up with.
As a website owner, you can send these notifications for free with a tool like OneSignal.
I highly recommend using website push notifications to get recurring traffic to your blog and to convert more visitors into subscribers.
One way to use these notifications is to send one every time you publish a blog post.
To learn more about website push notifications, read this: LINK PUSH NOTIFICATIONS
Optional: Send an email to every blog(ger) you mentioned and ask for shares and links
You probably mentioned a few other bloggers in your post, especially when you follow the process highlighted in this blog post. To gain more shares and links, you can send each of these bloggers an email letting them know that you quoted them in your post.
Not every one of these bloggers will share your post, and not every one of them will reward you with a link, but some of them will. Your blog will benefit from this in the long run, and you will improve your social media visibility and SEO rankings.
These were the items that should be on your todo list immediately when or immediately after you publish a post. BUT, you are still not done!
What to do AFTER you publish a blog post
Post-publication doesn’t stop after you published a post. We’ve already talked about what to do when you hit that publish button. But even after you cleared that list, your tasks don’t stop.
A blog is a website, and a website needs continued traffic via SEO and social media to be successful. And therefore, you need to continue to work on it even after you publish a post.
Schedule more updates for social media
To most social networks, you can, and you should post your content more than once!
Our Twitter strategy, for instance, uses recurring Twitter queues that repeat our best content on autopilot. We use the tool SocialOomph for that.
How To Set Up Recurring Queues For Twitter With SocialOomph (And Why)
On Pinterest, you can create more than one pin and also repeat pins on several boards.
Tailwind For Pinterest: More Than Just Scheduling
And on Facebook, you can also repeat content on your Fanpage – and even work with Facebook groups to gain more traffic to your content pieces. This is a continuous process of optimization and finding new ways to repost your content for more traffic.
There are many theories on how often you can post on each social network. You can read more under the following link:
How And Why To Schedule Your Social Media Updates In Advance – And 7 Tools To Get It Right!
Keep your post up-to-date
Keeping it up-to-date even after you publish a post is vital to your post and blog’s success. An up-to-date post can receive massive traffic via social media years after it was initially published. Even more importantly, Google does use regular post updates as a ranking factor.
Sometimes it is even an excellent option to completely rewrite a post instead of just adding a few paragraphs of text to an old post.
You should regularly check whether an old post isn’t performing anymore, especially regarding search engine traffic. If this is the case, simply add a few paragraphs or write an updated version of the post.
You can use Google Analytics and search console to find out whether a post has stopped seeing search traffic.
Google Analytics
Check comments regularly and answer
Blog commenting is still a massively important way of communicating with your audience. You should check and answer every single blog comment. It doesn’t matter if a post is old or new. Reply, even if the post getting the comment is old.
Even top bloggers like Neil Patel do answer every single comment, and they have good reasons for that!
Neil Patel answers EVERY Blog comment
Examine SEO results and optimize
It is essential to regularly check the SEO results for every post and optimize where possible.
Things to look for are (examples):
- Is the post getting a lot of impressions but no clicks? Check whether you can improve the snippet via the Yoast SEO plugin.
- Is the post getting no impressions but a good CTR – see if you can add more keywords to the post.
There are more SEO optimizations you can make to old posts, see this post for more information: 14 Ways to Optimize your Blog Post for SEO
Examine social media results and optimize
As you are continually checking your SEO results, you should also regularly monitor your Social Media results. Especially as you post and schedule your content repeatedly, you can make updates to the social media updates and examine your click-through-rates.
Final Words
As I said in the introduction, blogging is only 10 percent about writing blog posts. The other 90 percent is about distributing your content. Your process when you create and publish a blog post should reflect that.
For the whole process, it is massively important to always stay focused on your audience and to always focus on distributing your content to your audience.
The process above should be suitable for any blogger, whether you are just starting out or even if you have a blog that already has been going for a long time and has a lot of traffic.
With time and practice, your process may vary slightly, but the overall process will stay the same.
Do you want to create better blog posts? Do you want to learn about some types of blog posts you did not know? Do you need help to structure your posts in the best way?
Our Blog Post Templates help you with all that. Get 6 blog post templates for free. Download our blog post templates here!