
Today I’ve got a gem for you – a tool that doesn’t just make optimizing Adsense installations easier – it makes the whole process easy: Adngin. But before I dive into what Adngin does and does great, I need to explain the problem!
Adsense (as you probably know already) is Google’s service for integrating advertising into your web page so that Google Adword clients can show Ads on your site. The revenue generated from the Ads is then shared 50/50 between you and Google.
The Problems With Adsense
Face it, when it comes to monetizing blogs and websites, Adsense is still the starting point for many. It is easy to integrate into almost any website – especially when using a plugin for WordPress, and you can get results fast. Sure, everyone who uses Adsense knows that he won’t get rich simply by integrating Adsense Ads on his blog (rare exceptions aside), but Adsense makes it too easy to start to ignore it completely.
Today I’ve got a gem for you – a tool that doesn’t just make optimizing AdSense installations easier – it makes the whole process easy: Adngin. But before I dive into what Adngin does and does great, I need to explain the problem!
Before you read on - we have various resources that show you exactly how to use social networks to gain massive traffic and leads. For instance, check out the following:
FREE Step-by-Step Twitter Marketing GuideFREE Pinterest Marketing Ebook
If you are running your blog, you probably had thoughts like the following:
Maybe I should integrate Adsense – even if I only get my Servercosts back…
Maybe Adsense will give me an idea of how much my blog is actually worth.
And Adsense can do these things and more for you. But, as always in life, every good thing comes with pitfalls and problems. And as easy as it was to create an Adsense account and get ads running on your site, the bigger the surprise when you find out that it’s not that easy to make money with Adsense as you thought.
Some of the problems with Adsense you won’t be able to fix yourself – which can be frustrating. Adblockers are examples of this – a growing share of the web population uses software to filter out ads from their web browsing experience. But that is Google’s problem to fix – although I’m currently not sure what the best way to tackle this would be to them either.
But one thing is for sure: Google will have to find a way to stop this trend from progressing too far – or their revenues will drop drastically in the future.
The good news is: Right now, Adblockers aren’t too big a problem – you can still make money on Adsense.
Another problem is ad blindness: People who are so used to annoying ads they don’t even need an adblocker anymore – they simply don’t see the ads anymore.
But all these problems mean that simply starting to show ads on your site won’t be enough! You need to optimize how and where you display ads!
Hey, before you read on - we have in various FREE in-depth guides on similar topics that you can download. For this post, check out:
FREE workbook: CREATE AWESOME BLOG POSTSFREE Beginner's Guide: START A BLOG
Optimizing Adsense Placements On Your Site
Optimizing your Adsense ads and placements mainly relies on a few kinds of settings: Placement locations on your site, form factor and size of ads, type of ads (image or text), and layout settings (in the case of text ads).
If you want to make money on Adsense, you will need to optimize your Adsense usage. And in many instances, you won’t be able to get a decent amount of money from Adsense without optimizing your Adsense ad placements on your site.
Now, a typical scenario when you integrate Adsense Ads the first time on your WordPress blog is the following:
- You first create your Adsense Account. You follow the procedures to get it Google approved, and then you are ready.
- You then install one of the various Adsense plugins for WordPress. There is even one that Google maintains themselves.
- You either have to create your adunit manually in Adsense and then create the placements via the plugin you installed, or your WordPress plugin does it for you.
Now you have ads on your site – and this is where the trouble starts.
Here is what is most likely going to happen: Your first idea of where to place your ads and how you format them in Adsense (in the case of text ads) will be… less than perfect and you will probably get less than ideal results – and you will make a lot less money than you thought you would.
That wouldn’t be so bad – what you need to do is optimize. But the problem is that for this optimization process you will need to create constantly new Adunits, different placements, measure your results and compare results for different tests you ran.
The whole process relies heavily on AB testing – and that’s the problem: AB testing without a tool that allows for integrated AB tests is a pain if all goes well and a disaster when it doesn’t go so well.
With Adsense Ads and WordPress, there wasn’t any good tool for optimization and testing. What you had to do is go back and forth between your Adsense account (which provided data and analytics) and your WordPress plugin (which allowed you to place the ads). You would end up with literally hundreds of adunits in your account. You would need to run timed experiments to achieve comparable results.
The ease of getting into Adsense was countered by the complexity of testing and the hassle of a userinterface that was designed for starting but not for optimizing.
Enter Adngin.
Optimizing With Adngin
Adngin is a startup from Tel Aviv that aims to make optimization of Adsense easy – and largely succeeds.
I will only review Adngin in a typical WordPress scenario as I have not used the tool in any other situation and am not sure about how the integration works.
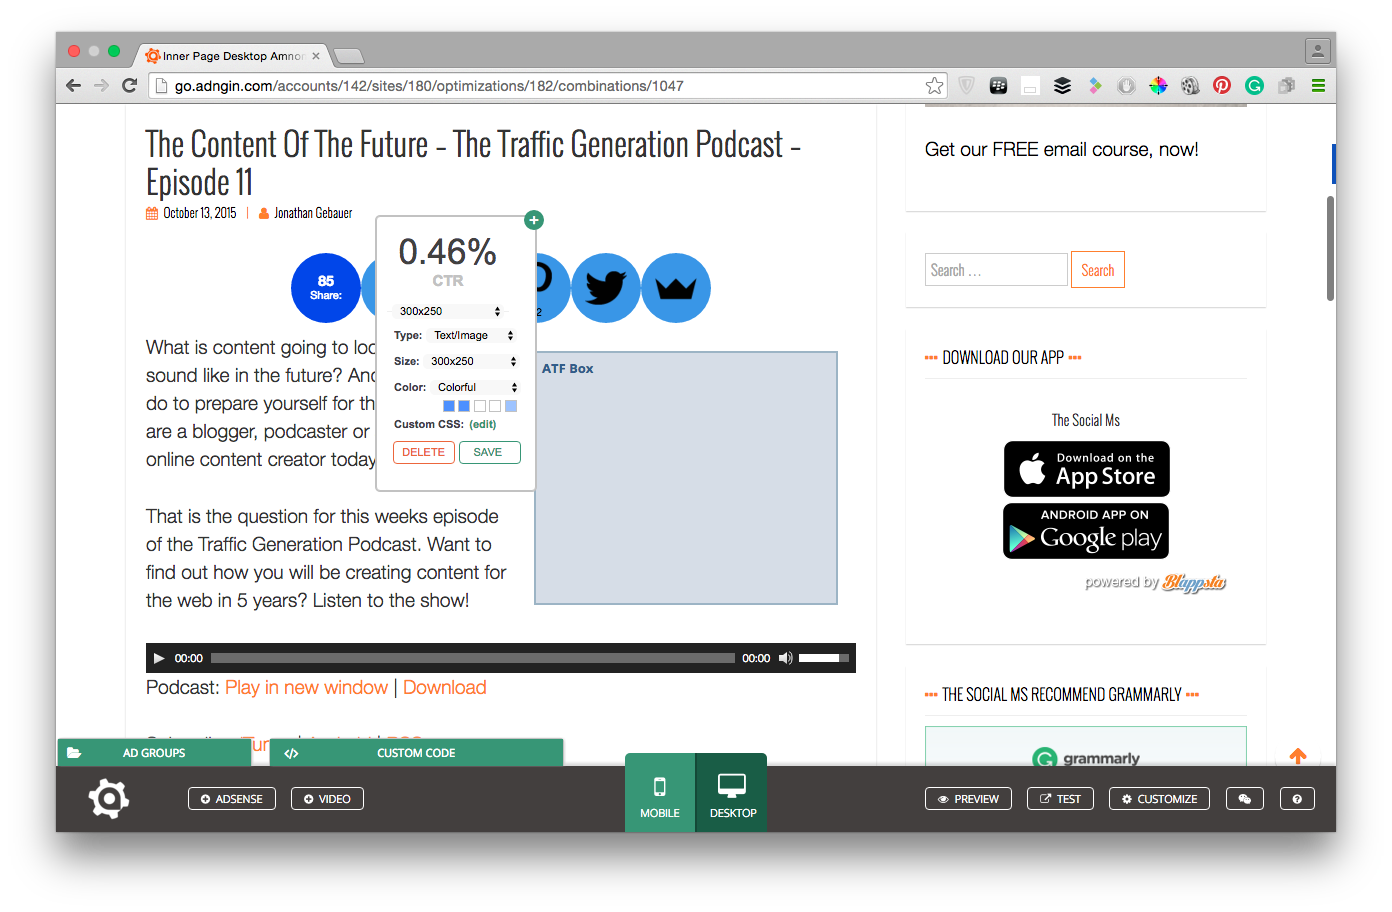
Adngin allows you to place adunits within a live preview of your site
Adngin allows you to book a free demo on their main page here. You can download the free Adngin plugin from within the WordPress plugin repos or simply install it by searching for Adngin from within the Add New Plugin feature within your WordPress installation (the way you probably install most plugins).
The plugin connects to your Adngin account, and your Adngin account connects to your Google account (and, therefore, Adsense).
Now you are ready: log in to Adngin and you can now run the complete Adsense process from their site. Nothing to do from within the clumsy WordPress Admin panel anymore, and no need to login to Adsense. All handy in one place. You create your ad placements directly from Adngin, and you examine your results in Adngin. This alone would make it a great tool that could save so much time – but there is more!
Using Adngin
Adngin has two main tabs: The Dashboard tab and the Experiments tab.
The Dashboard is where you view your Analytics. It divides into 2 areas: The Earnings tab (where the results directly pulled from Adsense are shown and where you can see how much you earned) and the Performance tab.
The Performace tab displays results that Adngin measured by itself (therefore, the Performance Tab only shows values like clicks, RPM, CTR, etc. but not actual money earns). This explains why there are (sometimes huge) differences between the Performance tab and the Earnings tab – as Amnon (one of the founders of Adngin) explained to me, Google doesn’t accept every click you generate. Sometimes I get up to 100% more clicks on the Performance tab! It is helpful though to know how many of your clicks are getting devalued though and can help in optimization. (I hope that Google isn’t charging these clicks to their clients… :))
The performance tab also shows the results of your experiments and which version of a test is performing better. Experiments? Yes, that’s where Adngins real magic lies – let’s head over to the Experiments tab!
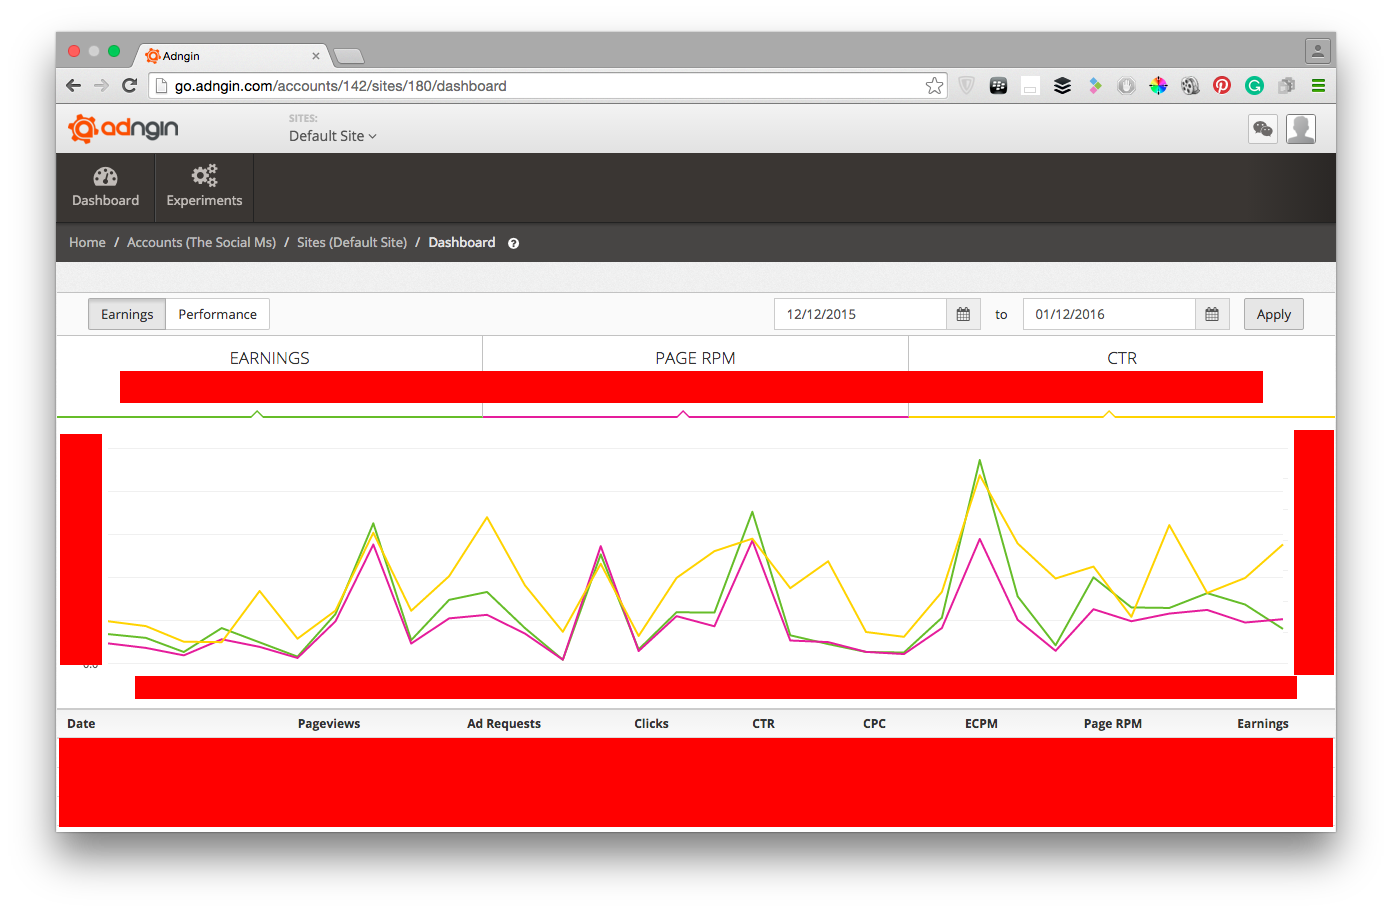
Adngin allows you to compare data pulled directly from Google Adsense with what it measured itself
First you will have to define pages – which means the subtypes of pages on your site. This is done via regular expressions (regex) which are a way of identifying sets of URLs (if you don’t understand what I’m saying Amnon will help you during your personal demo).
After you defined your pages you can set up “Experiments” on these pages: These are sets of adplacements that you place within a live preview! The editor is easy to use, although it could use some extra explanatory text here and there. You can select different sizes for your placements, type of ads, and so on.
You can also create variants for each placement within an Experiment – which is an essential feature! With this, you can see whether a text ad or an image ad works better for a particular placement, or what the best format for a text ad is.
What happens when you put your experiments live, is the following: Adngin will automatically evaluate which ad version is running better AND if you have multiple top level experiments for a page that of those is delivering the best results. It will then automatically select the better version and show it more often.
It will however not completely stop showing the “bad” version. So if something changes and the other version is now better than the first, the system should see this sooner or later and start showing the other version.
Once it is running, it is running well. Adngin delivers a kind of AB testing experience that I wish I cold have with every tool that employs testing at its core!
Learn to drive more traffic to your blog from social media with “The Social Traffic Code!”
Final Words
While this may seem complicated, it isn’t. Sure, Adngin is a startup, and there are some quirks here and there, but overall the system is pretty intuitive! Sure – there should be a better alternative to Regex for defining pages – especially since a WordPress plugin is installed already (sending over pages in categories should be possible for instance). Some settings in the settings area could have been explained better. And so on.
But the real achievement of Adngin is that it delivers an Adsense experience that is essential for everyone running adsense ads – and that Google themselves is not able to deliver.
Before I forget: The best part of Adngin may be that it is free for sites with less than 300,000 hits per month!
So if you are planning to run Adsense ads, or already running them on your blog – give Adngin a try!