So, you decided you want to start your blogging journey – but it all looks complicated to you? Don’t know where to start? You feel dazed and confused by all the different tools and options available to you?
Or did you have a look at all-in-one hosters like Bluehost offering hosting for $4.99 (or less) per month only to find out that you need to pay 3 years in advance?
Do you want to start your blog and choose a hosting service that will grow with you as you grow without tieing you to a hosting solution for years that you do not even know how well it is going to fit your needs?
This guide has you covered.
Before you read on - we have various resources that show you exactly how to use social networks to gain massive traffic and leads. For instance, check out the following:
FREE Step-by-Step Twitter Marketing GuideFREE Pinterest Marketing Ebook
Warning: All-In-One Hosters Cheat (Bluehost, HostGator, …)
I need to start with a warning: Loads of hosting services out there claim to offer unlimited hosting for ridiculously low prices. These offers aren’t what they claim to be. I know that because I’ve been burned – and paid the price! Here is why:
- The price of $4.99 per month (or 3.99, 2,99, …) is only valid if you pay in advance for 3 years! So, if you thought you would just try that blogging thing and stop if you don’t like it just turned into a $200 or more investment! Crazy, right?
- “Unlimited” hosting isn’t truly unlimited – you are getting very limited system resources, and if your server has too much traffic, they might not switch you off, but your sites will become unbearably slow. This is made worse as these are usually shared servers – there are other sites hosted on the same server. This means it’s not just your traffic that can slow you down – it can be someone else’s traffic, too.
Why are so many influencers like Pat Flynn or Jeff Bullas recommending these services? The answer is: When they started recommending these companies, there was no better solution out there – and they are getting a pretty awesome affiliate deal.
Bluehost is paying $50 per new user to affiliates. Jeff and Pat probably still believe they are getting their audience a good deal – and the money is motivation enough not to see the truth.
But today, I want to present you with a better hosting solution, that only requires a minimal advance investment, will truly only cost you $5 a month (for the traffic you can expect as a new blogger – these 5 bucks will actually get you further than the standard Bluehost account) and can be canceled at any time. It’s also a lot easier to use than CPanel based services like Bluehost.
And you get a 14 day trial with no credit card required!
I’m talking about Cloudways! And in addition to everything above you can also get $15 in free hosting credits when you sign up with this bonus code: THESOCIALMS
Before you ask: Yes, we are getting affiliate commissions from them as well, but far less than Bluehost is paying. I could also sign up for Bluehost’s affiliate program, but I can’t do that and still sleep well.
Before We Get Into The Step-by-Step Guide, Here Are Few Things You Should Know…
Before we get into explaining step by step how you can set up and run your blog using Cloudways web hosting, there are a few things you need to understand:
Hey, before you read on - we have in various FREE in-depth guides on similar topics that you can download. For this post, check out:
FREE workbook: CREATE AWESOME BLOG POSTSFREE Beginner's Guide: START A BLOG
First, Cloudways is not an All-in-One hosting service, which creates one single minor complication: You need to get your domain elsewhere. Domains can be bought on sites like GoDaddy or others, and are usually bought for prices between $5 – $30 per year.
That payment for owning your domain name for one year is the only upfront investment you will have to make!

What we will do today is setting a blog up on the minimal Digital Ocean based account. What this will mean is that Cloudways will reserve the resources in one of the Digital Ocean data centers (you can choose which one), provide you with an amazingly easy to use and understand administration panel, and a one-click installer for installing the WordPress software on your new cloud server. We’ll walk you through this below.
Third, Cloudways comes with quite a few further advantages compared to shared hosting (Bluehost and others):
- The one-click installer for WordPress beats the … out of anything provided by other hosters. It installs a pre-configured WordPress installation, that comes with various security and caching features. Security you might not notice at once – but the caching setup is amazing! It provides several caching layers and speeds your site up to the limit!
- Should you reach the limit of your current server setup, you can upgrade to the next level with a simple click of a button. The basic account should be enough for at least 30,000 pageviews per month (realistically you can probably go up to 50,000 on an average setup). But should you need to upgrade, that’s easy to do. And you always know how much you pay!
- Integrated backups are included in any Cloudways server. By default, Cloudways takes a backup of your site every day. This may not sound so important in the beginning, but believe me, it is: Imagine blogging for a couple of months and something goes wrong. With Cloudways you have peace of mind!
- Kick-Ass support staff: Cloudways provides support by chat and email – I’ve never had to wait longer than a minute for the support staff to answer via chat. I’ve had more complicated problems twice, and both times they were solved within a couple of hours. When we were still working with Bluehost, support could take days to get back to us!
Step-By-Step Guide to Setup Your Blog With Cloudways
Now that we’ve got the above out of the way, it’s time to guide you through the process of setting up your blog. Set your stopwatch: if you rush through these instructions you can finish in 15 minutes!
Step 1: Sign up for Cloudways
There is nothing complicated here: Click here to go to Clourways, now!
Click on “Start Free” in the top right corner.
On the next page, before you enter your user data, click on “promo?” below the button labeled “Start Free Trial”. This will allow you to enter our promo code to get the $15 hosting credits.
Now enter your future login data: Email and password. Don’t forget to enter the promo code: THESOCIALMS
Now click on “Start Free Trial.”
You’ll get an email with an activation link. Click that link to activate your account.
(Time required: 1 minute or less.)
Step 2: Create Your Server
Right after you set up your account, it’s time to setup your server.
Once you’ve clicked the activation link in the email you got, you will land on the server setup page:

(click on the image for larger size)
Here you will do 3 things:
- Select the app environment you want to install: Select WordPress (the software that runs your blog) and type in some names for server, app, and project.
- Select the cloud hosting provider you want Cloudways to use for your server and the server size. Select “Digital Ocean” and move the server size slider to the lowest setting – you can ignore the warnings that this is for small sites only. Your site is new, and this setting still gives you better performance than anything you get with Bluehost or Hostgator.
- Select which datacenter you want to use: I selected London, but you can select whatever is closest to where your target audience is located.
You can see which settings I put in in the screenshot above.
Now, click on “Launch Server” (bottom right).
You will land in your accounts server overview page. It lists your current server – and shows you that it will be ready in a couple of minutes.
What is now happening in the background is that Cloudways creates the server in the background on Digital Ocean’s cloud hosting infrastructure. It also creates the new WordPress installation for you and configures several caching layers.
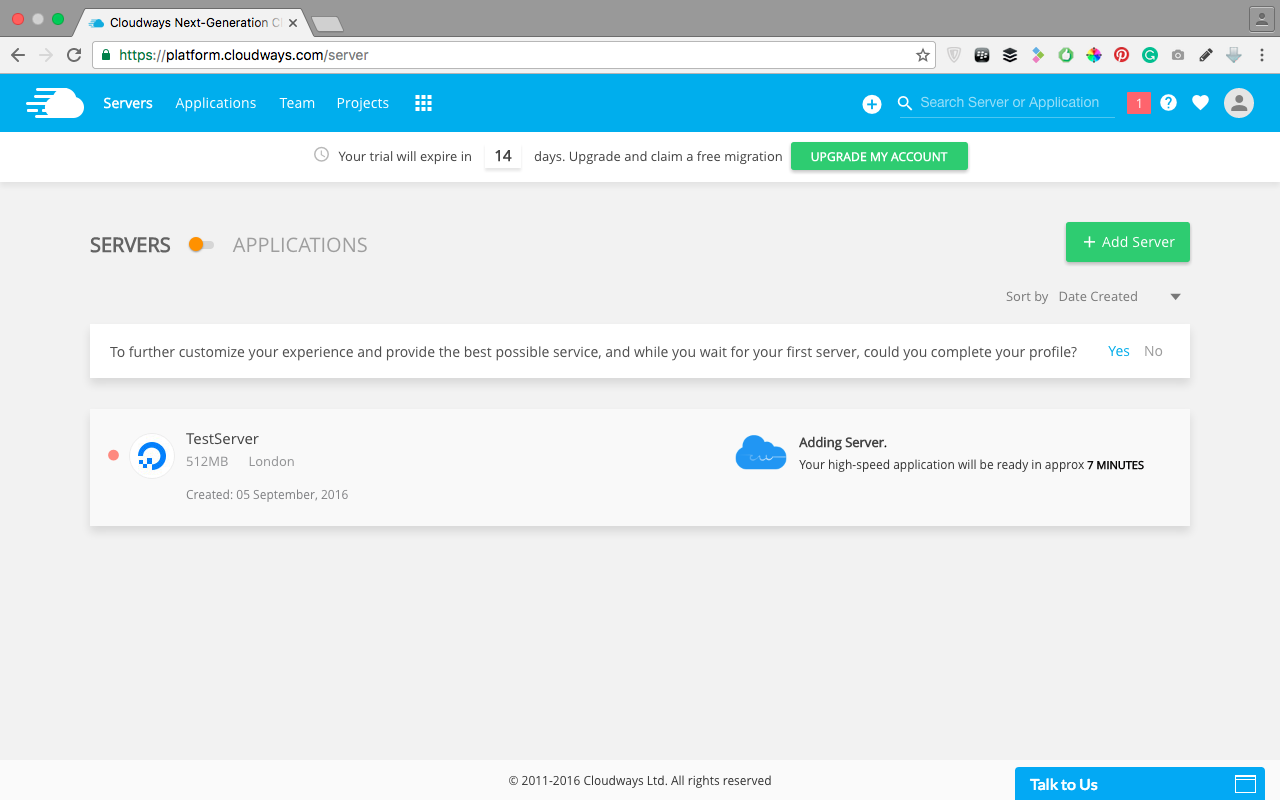
You’ll have to wait until this finishes.
(Time requirement: 1 minute filling out the details, 7 minutes waiting for the installation.)
Step 3: Buying a Domain Name and Connecting to Your Blog
Once you’ve completed the previous step, your server is already online – and your blog is already running. Let’s test that real quick:
While you are still on the server overview (which is now showing that the installation is finished), switch to the application overview (top left of the screen), which will show you your newly installed application:
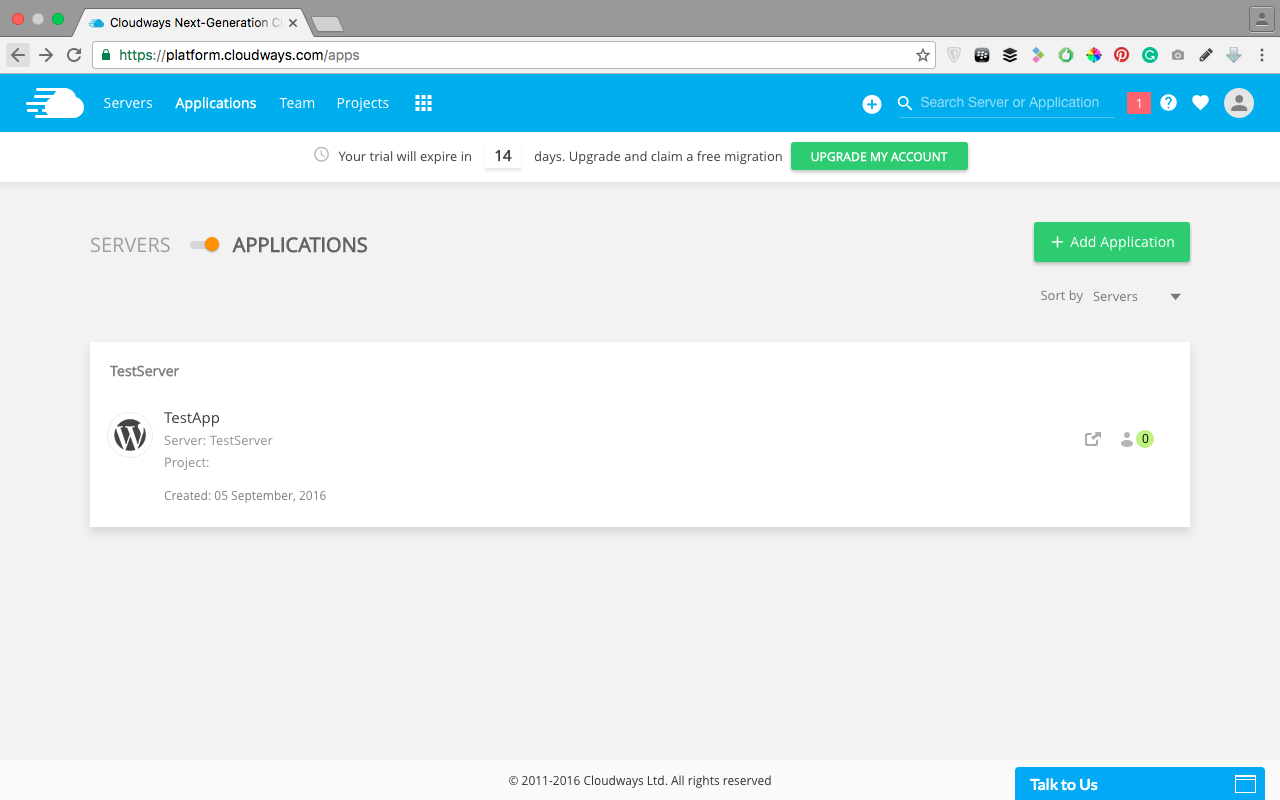
Click on the newly installed app. Your application management details will open:
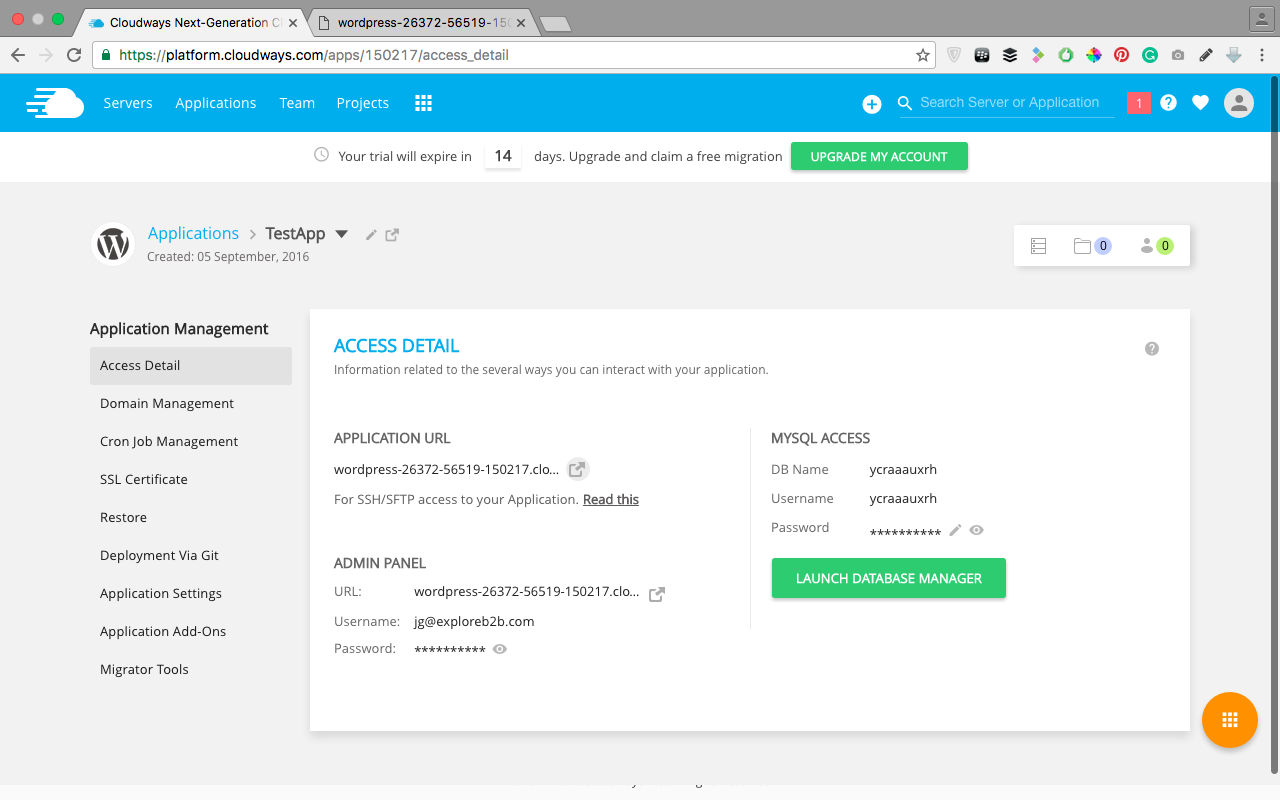
click on the image for larger version
On this page, you will see a section for “Application URL” and a section for “Access Details”. When you click on the link under application details, you will be taken to your new blog in a new browser tab.
The section with access details provides you with another URL on which you can log in to your blog and also provides you with your username and password (the password is revealed by clicking on the eye symbol). You can ignore this for now – we’ll return here in the bonus step in the end of this guide.
For now, let’s now get a domain and connect it to your new blog:
On the application management page you are currently on, you have a menu on the left in which you can select “Domain Management”.
On this page you can enter a domain name – and you will also find a link to a tutorial by Cloudways themselves on what you need to do.
Here are the steps in a nutshell:
- Buy a domain – I recommend using GoDaddy. You simply have to find a domain name that is affordable and not yet taken, select it and check out.
- In your new GoDaddy Account, you need to create a CNAME entry pointing your newly bought domain to the current domain of your blog.
- Now you need to enter your new domain in Cloudways on the Domain Page you are currently at as the primary Domain.
This was the last step. Some domain providers take a while before your CNAME record becomes active, on others you are finished within seconds.
Your blog is now available at the new domain.
(Time required for this step: 5 – 6 minutes)
Bonus Step: Change your blog theme and write your first post.
Ok, leaving you at the above would have been a little unfair. You are ready to go – but it’s hard to see the light yet. You want your blog to look great, you want to know how to enter a post, you want to know how to delete that damn filler content… right?
Let’s do that now!
In the Cloudways admin panel go back to the page for “Access Details” in the management section of your server.
Now, open a new tab in your browser, and type in:
Your New Domain/wp-admin
Yes, just follow your domain with /wp-admin – that is your administration panel for your new WordPress installation.
Login with the login data from Cloudways. (Remember: the password is revealed by clicking on the eye.)
The administration dashboard of WordPress will open:
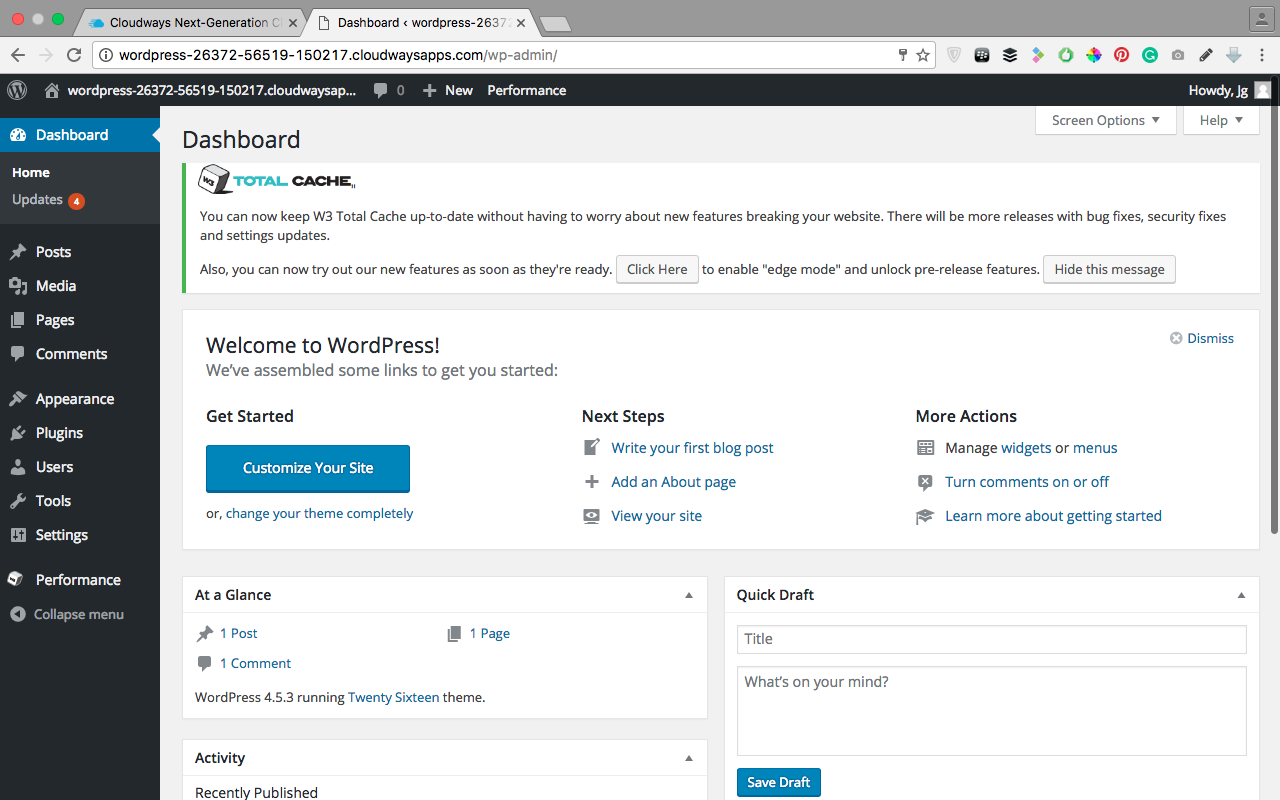
To get a better look for your blog, you need to find a theme that you like. Hover over “Appearance” on the left, and then click on “Themes”.
Here you can select one of the preinstalled themes or install new themes. You can preview the thousands of available free WordPress themes and have them automatically installed.
Once you’ve selected a theme you like, you should delete the filler blog post that came with the installation: Just click on Posts in the left menu. An overview over all existing posts will open:
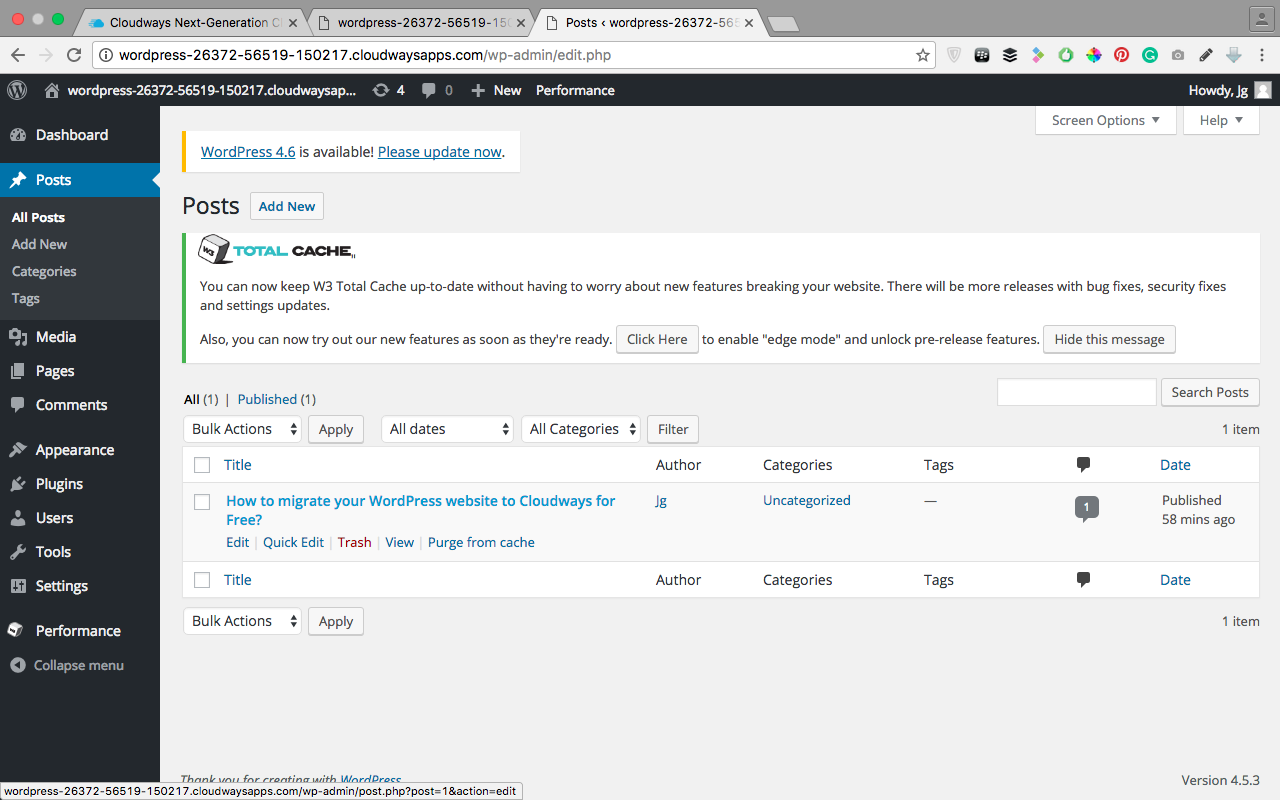
Hover over the one post you have in that list and select “Trash”.
Now it’s time to write your first post:
On the posts page, you will see a button “Add New” near the top. Click on it and the post editor will open:
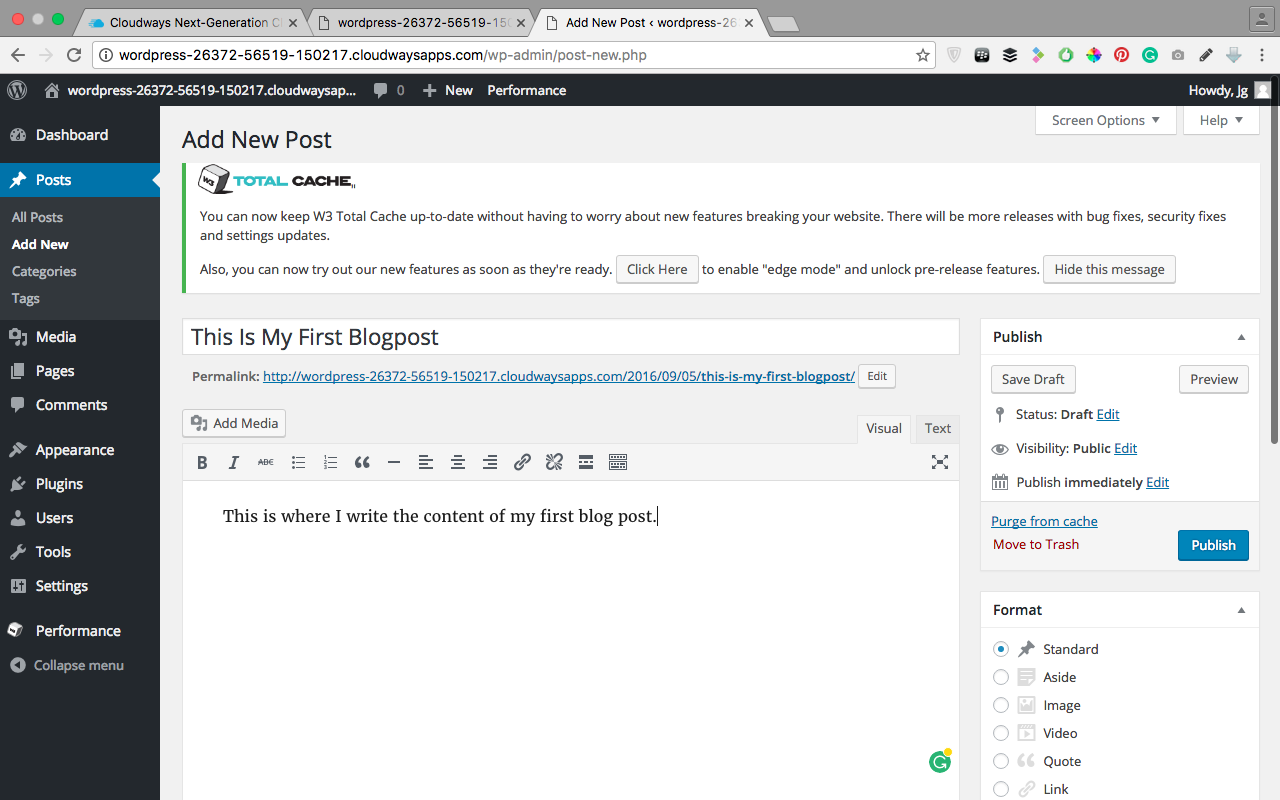
Here you can enter your first blog post. Once you are happy with your post, you can hit publish and it will be published at once.
Congratulations – you are now a blogger.
Final Words
You are currently in a 14-day trial on Cloudways. You have not entered your credit card details, so once your 14 days are up, you will lose your server. To prevent this from happening you need to enter your credit card data.
Cloudways only charges after your first month of paid membership – after your 14-day trial is up and after your $15 hosting credits have been used up that you got through our bonus code!
So, if you decide to enter your credit card data – your 14-day trial will basically become a 2 months trial!
(Don’t forget to enter the promo code: THESOCIALMS)
What are you waiting for? Head over to Cloudways, now!
Note: In case, you are already hosted with another provider, here is the story of how Bluehost killed our launch, how we switched to Cloudways, and how easy it was.
You already know it: Starting a blog means you have to do something new. It is not just hosting, there are other steps you have to take.
Do you want a friend to guide you through all the overwhelming first steps of starting a blog? Let us be that friend!
We created our book “Beginner’s Guide: Start a Blog” for you! Check it out!